Three Ways To Make Snow For Sensory Play
Sensory play and Safari Ltd. animals are a match made in heaven! We use our favorite Safari animals in any and every kind of sensory play we can, from the super messy to the super simple. Today, I’m sharing three ways that we like to create snow for sensory play. These recipes all pair wonderfully with your favorite polar animal figurines!
You'll Need:
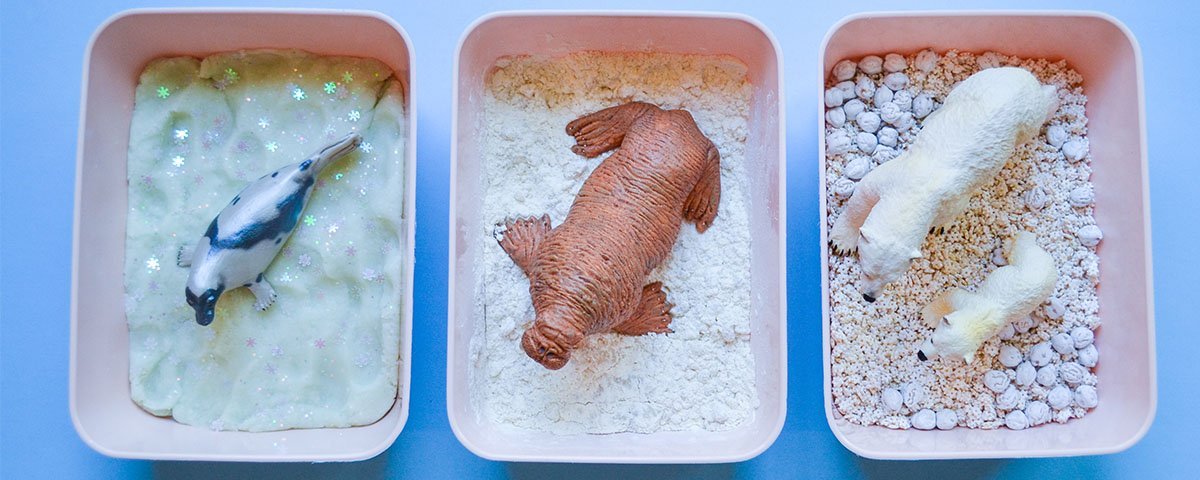
Snow Play Dough
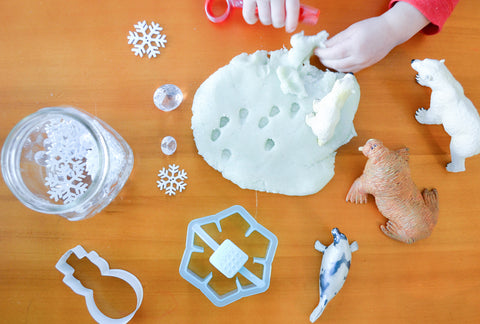
Play dough is a great base for sensory play with animals! We love making impressions of the animals and creating footprints in the dough. You can also use it to build your animals homes! I make most of the play dough that my kids play with using one basic recipe. To make a snow version of the play dough we added some white glitter!
Ingredients:
2 cups bread flour (all purpose flour is also fine!)
½ cup salt
2 tbsp vegetable oil
3 tsp cream of tartar
2 cups water
White glitter (extra fine is best)
How to:
To make your homemade play dough you will need: a large, deep pan (mine is similar to a wok in shape), a sturdy spoon or spatula, whisk, all of the ingredients listed above, and parchment paper. I use bread flour in my play dough recipe because I find that it makes for a softer and stretchier dough, however substituting all purpose flour will work just fine!
Step 1: Combine all ingredients in your pan and whisk to combine. Be sure to break up as many flour lumps as you can while whisking. You can choose to add the glitter now, or wait and knead it in once your dough is cooked.
Step 2: Cook on medium heat on your stove top. Stir very frequently (almost constantly). As you stir, scrape across the bottom of your pan with your spoon. The dough will slowly start to form a ball in the center of your pan as you scrape and stir. Continue cooking until the dough ball no longer appears wet. This usually takes 6-8 minutes, but could vary depending on your stove and pan.
Step 3: Lay out a piece of parchment paper and dump the cooked dough ball onto it. Allow the dough to cool in a ball for about 5 minutes. Once it is cool enough to touch, begin to knead the dough with your hands. Knead for about 5 minutes to help smooth out any lumps and soften your dough. If you haven’t added glitter yet, add it now by sprinkling it onto your dough and kneading it in.
Step 4: Flatten the dough into a pancake (2-3” thick) and cover with another piece of parchment paper. Allow the dough to cool completely. Once totally cooled you can play with it! When you are not playing with your dough, keep it in an air-tight container or zipper bag. Properly stored dough can be used for around 6 months!
Snow Cloud Dough
Cloud dough is a simple-to-make sensory base with a really unique texture! We love using it as “snow” because it is moldable, just like real snow. It’s also a favorite of mine because it only requires two ingredients that I almost ALWAYS already have in our pantry.
Ingredients:
-All purpose flour
-Vegetable oil (can substitute baby oil)
How to:
Mix 4 cups of flour and ½ cup of vegetable oil in a large container. Use your hands to mix the oil into the flour as evenly as possible. The cloud dough should feel powdery, but when you squeeze it in your hand it will pack together (like making a snowball!). Once your dough is mixed, move it into a tray for play and add your favorite Safari Ltd. animals, some scoops and spoons and a few small bowls or cups!
You may want to cover the floor with a drop cloth before play, or play with your cloud dough outside. It does clean up easily with a broom and/or vacuum cleaner!
Painted Pasta “Snow”

Painted beans and/or pasta are the sensory play base I use most frequently (especially for my preschool class). I love them because you can create such a wide variety of colors, you can store your base and reuse it over and over again, and they’re relatively easy to clean up with a vacuum cleaner! I used a combination of painted pasta and painted, dried chickpeas to create a snowy small world for our Safari Ltd. polar animals.
Materials:
Dried pasta and/or beans (I used small star-shaped pasta and chickpeas)
White acrylic paint
Large ziploc bag
Wax or parchment paper
How to:
Step 1: Pour your dried pasta/beans into a large ziploc bag. Do not fill more than about ½ full. Squirt a generous amount of white acrylic paint into the bag. Zip the bag closed and gently massage the paint around with your hands until all of the pasta or beans are covered. Lay the wax or parchment paper on a baking sheet or shallow tray. Spread the painted pasta out in a thin layer on the paper to dry.
Step 2: Once dry (usually a few hours, to be safe let dry overnight), use your hands to break up and pasta that has clumped together. Pour your pasta into a tray for play. Add some small cups or jars, spoons and tools for scooping. Lastly, add your Safari Ltd. polar animals and let play begin!
We used this base in our sensory table which has two sides. In the second side I put some cotton balls to add another texture for snow play!
With any and all sensory play, make sure to monitor your kids closely! Better yet, join in :)
**Opt for premade materials to use as "snow" and "ice": HERE, HERE, HERE and HERE **
**Find other fun winter themed items HERE.
 Facebook
 Twitter
 Instagram
