Create a 3D volcano to go with your favorite Safari Ltd. dinosaurs!
Using some common household items and kitchen ingredients, we'll show you how to create a volcanic eruption that will rock your prehistoric world! Read below for the full tutorial to create your own.

What you’ll need:
- Safari Ltd. dinosaurs! We used a Safari Ltd. Dinosaur TOOB: Sue and Her Friends TOOB
- Large piece of cardboard
- Small, empty container, such as a spice container
- Newspaper or other recycled paper
- Flour
- Water
- Brown paint
- Green paint
- Rocks
- Faux plants
- Red puffy paint or fabric paint
- Hot glue gun (*always have an adult’s help when using a hot glue gun!)
- Baking soda
- Vinegar
- Red food coloring
- Measuring cups and spoons
Directions:
Do you know how to create a paper mache volcano? Keep reading for all the steps you need to build one from scratch.
1. Cut a sturdy piece of cardboard into a base. Draw a circle that is slightly wider than you’d like your volcano to be. Ours was around 8 inches in diameter. You can trace something round, like a bowl to create your shape.

2. Using a hot glue gun to glue your empty container open side up into the center of your drawn circle. Next, scrunch some ripped pieces of paper into balls. Glue the paper balls around the container to create the shape of your volcano.

3. Mix some paper mache paste. Paper mache is a paste made from flour and water. We used ¼ cup of flour and 1 cup of water. Stir the mixture together in a bowl (some lumps of flour may remain, you can stir more as you use it!) and set aside. Take your newspaper or other paper and cut or rip it into strips. Strips should be about 1 inch wide and around 6 inches long.

4. To paper mache your volcano, soak strips of paper in the paste until moist and pliable. Be sure you dip the entire strip in. Use your fingers to gently wipe excess paste off of the paper strip and then place the wet paper strips onto your volcano shape so that they cover the paper balls. Do not cover the opening of the container! Overlap strips as you go and layer as needed. You will want to wrap paper around the edges (at the top and bottom).

5. If anywhere on your volcano starts to look too wet, just place a dry strip of paper or two in the area to soak up the excess paste. Once the entire volcano is covered, allow it to dry completely, at least overnight. If the paper seems too thin, or you find gaps anywhere, add another layer of paper mache after the first has dried.

6. Once your paper mache has dried completely, use brown paint to paint the volcano. Use your green paint to paint the cardboard base. Allow them both to dry.

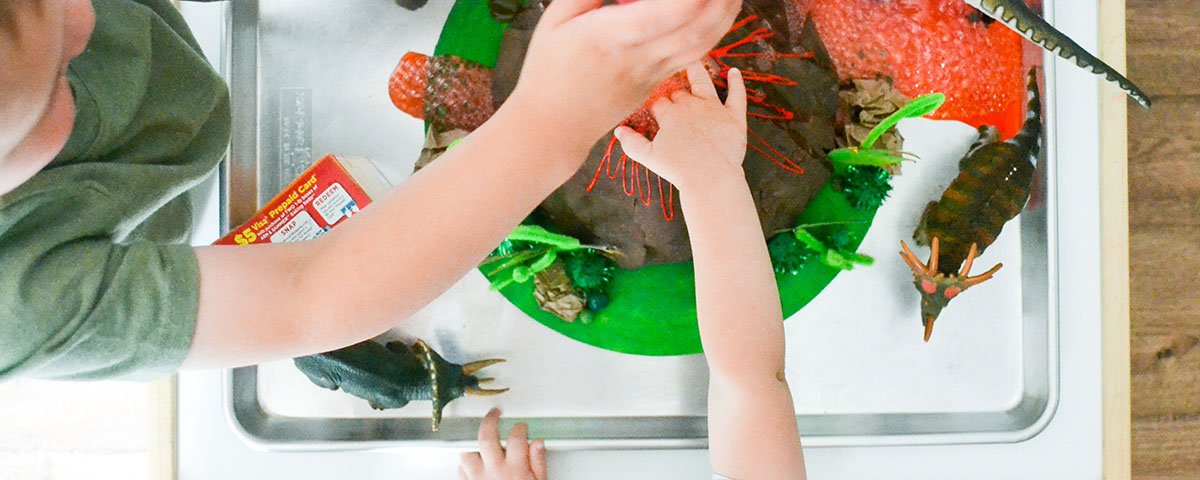
7. Time to decorate your volcano! We added rock, faux plants, and Safari Ltd dino figurines to our volcano. You can also paint some smaller bits of cardboard green and cut them into grass shapes. Or bend one end of several green pipe cleaners into a spiral to create a fern. Lastly, you can use red puffy paint to add some lava to the top of the volcano. Drizzle the paint back and forth around the opening of the volcano, allowing it to move down the sides. Now your volcano is complete!

8. Create a volcanic eruption! (*NOTE: your volcano may not survive this eruption, since it is made from paper - make sure you have played with it as much as you want before moving on to this step!). To make your volcano erupt, first add a few teaspoons of baking soda into the spice container at the center of your volcano. Next, pour your vinegar into a squeeze bottle and add a few drops of red food coloring. Take you volcano outside or place on a baking sheet or other tray with raised edges (to catch the mess!). Slowly squirt vinegar into the volcano opening and watch it erupt! You can repeat the reaction as many times as you like (add more baking soda or vinegar as needed!).


Using Alternative Materials
While traditional materials work well, using alternative materials can add unique textures and appearances to your volcano. Here are some creative options to consider:
- Tissue Paper
- Egg Cartons
- Toilet Paper Rolls
- Paper Towels
- Coffee Filters
- Natural Materials (small rocks, sand, dried leaves)
- Foam Sheets
- Clay
- Fabric Scraps
Incorporating Lights/LEDs
You can make your paper mache volcano even more impressive by adding lighting effects. By incorporating LEDs or other small lights into your design, you can simulate glowing lava for a more dynamic and realistic creation.
Place red or orange LEDs inside the volcano structure, then position them near the top where the "lava" would emerge. Battery-operated string lights or fairy lights also can be used – just wind them around the base or through the interior for a dramatic effect.
After you’ve placed the lights, make sure they are secure. You might consider using translucent materials for the lava so light can shine though. Additional details not only enhance the visual appeal of your paper mache volcano, but they also add an exciting, interactive element to the project.
Adding Sound Effects
Sound effects further enhance your paper mache volcano by making it more exciting and realistic. You can use either a pre-recorded sound module or a smartphone app to play rumbling and eruption sounds. Make sure you secure the sound source inside or behind the volcano for an immersive experience.
For a louder effect, connect a Bluetooth speaker and hide it within the paper mache structure. By syncing the sounds with LED lights, you can create a dramatic, synchronized eruption.
You can also record your own custom sound effects, using materials like gravel or soda for your own unique audio. To ensure the sounds loop continuously, set your app or device to repeat the audio.
Making It Interactive/Movable
Want to add an extra layer of engagement and fun to your paper mache volcano? Try making it interactive and movable by mounting the volcano on a sturdy, wheeled base so it can be transported and repositioned with ease.
Use a lazy Susan or a turntable mechanism at the base so the volcano can rotate, providing a 360-degree view of the eruption. Add removable parts like detachable sections of the volcano that reveal its interior, which will elevate the creation’s educational value.
You also might incorporate simple mechanisms like levers or pulleys to simulate eruptions or lava flow. These types of interactive elements transform the volcano from a static model to a dynamic, hands-on learning tool that is sure to captivate and educate viewers of all ages.
Exploring Different Volcano Types
Showcasing different types of volcanoes through your paper mache project offers valuable learning opportunities to your audience.
There are several types of volcanoes, including shield, composite, cinder cone, and lava dome – each with unique characteristics and eruption styles. Understanding these differences can deepen knowledge about volcanic activity. For example, shield volcanoes have gentle slopes and erupt with flowing lava, while composite volcanoes are steep and erupt explosively.
Discussing what triggers volcanic eruptions, such as tectonic plate movements and magma composition, can enhance this educational experience. Likewise, mapping where major volcanoes are located around the world, like Mount Fuji in Japan or Mauna Loa in Hawaii, provides geographical context and highlights the global nature of volcanic activity.
Integrating these elements makes the project more than just a craft—it becomes a comprehensive learning tool.
Alternatively, if you’re running out of time, grab the DIY Volcano in a Box at Safari Ltd!

